You all weren't the only ones requesting a wreath tutorial. My friends and I often host Pinterest Parties (this is the perfect way for me to still see my friends and hang out with two babies at home!) A Pinterest Party consists of each of us bringing a yummy dish we have been eyeing, drinking some wine, and making a craft together. After my friends saw the picture of the wreath, they decided that would be our next craft. So all of these pictures are from me teaching them how to make one. It's actually very easy once you get started. I hope I can explain well enough on here, if not, check out YouTube for some video tutorials. Here we go!
What you need:
- 1 metal wreath frame (any size you want, I used 16")
- 2-3 rolls of 5" burlap ribbon (It just depends on how full you want your wreath)
- 1 pipe cleaner cut in half
- Ribbon, a wood letter, flowers or anything you want to personalize your wreath
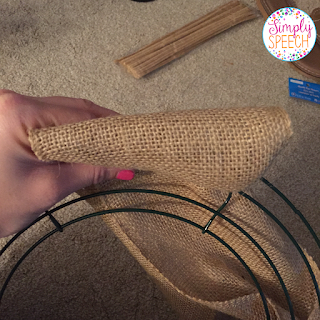
First step, turn the wreath frame over and tightly loop the burlap around the middle wire. Some people prefer to tie it in a knot, I like to use a pipe cleaner to secure the burlap to the frame. This won't be seen so it doesn't have to be pretty. Then, pull a few inches of the burlap ribbon through the top row of the frame. Keep it loose like in the picture above. Hold it with your thumb and index finger while you loop the burlap through the second row of the frame. It should now look like the picture below.
Do the same thing for the bottom row of the frame. At this point, your wreath should look like the picture below.
After you have your 3 rows of burlap loops, slide it all the way over to the right so the burlap scrunches and looks fluffy!
See how the frame is divided into sections? You will complete these steps twice in each section. Then, do just a single loop through the middle before moving on to the next section of the wreath. Does that make sense? So you will have a row of 3 loops, a second row of 3 loops, a row of 1 loop in each section of the wreath frame.
If my directions were clear enough, your wreath should start to look like the one pictured above. You want to try to make sure the back isn't super fluffy- it will make the wreath harder to hang.
Once you are finished, secure the end of the burlap to the frame with another pipe cleaner. Then, decorate your wreath! I had some help with my bow, but here is a tutorial I found on Pinterest.
Check out my adorable friends and their fun wreaths! I am super excited because 3 of these ladies are expecting little girls in the next few months so I see lots more Pinterest Parties in our future (probably with more tutus and bows!)
Below is the video of the WFLA news segment we filmed for Gayle's Guide to Pinterest on burlap wreaths.
Happy crafting!


