In My APPinion: Social Skills with Billy

Friday, December 18, 2015
Appy Friday! I don't know about you, but social skill activities and materials are always things I am in need of. With the Autism population higher than it has ever been, you are very likely to come across a student that has social goals on his or her plan of care- no matter what setting you are working in. The Virtual Speech Center has recently released an app called, Social Skills with Billy that is designed  for children with Autism. This app was created to allow them to practice social skills and pragmatic language in real-life situations and to practice identifying feelings.

Here is how the app works. When you open the app you will see the screen above. Here, you can adjust the settings, learn more about the app, and access student reports. When you are ready, click start to begin the app.
You can add multiple students to the list and multiple students can use this app at one time. This is always a great feature for SLPs that work in the school setting or run groups. Once you have added and selected the students to work with, click on next. 
Here you can choose the activities for each student. You can choose anywhere from 1-7 of the activities to target at a time. There is also an option to edit each activity and specifically choose which scenarios you want to use.
Once you have made your selections, you can begin using the app. Below is an example from Identifying Correct Responses in Dialogues.
The screen shot below is from the Identifying Right vs. Wrong Responses.
This prompt is from Identifying Feelings by Following Directions.
Below is a prompt for Identifying Feelings in Multiple Choice.
Identifying How One Feels Based on Short Case Scenarios.
Lastly, Stating How One Feels Based on Short Case Scenarios.
I love that this app explores social skills in so many different ways. The graphics are colorful and engaging, but not too overwhelming or busy. Another positive for this app is that it allows you to use it with multiple children at a time, which is perfect for social skills groups. The scenarios used in this app are real life, which provides great real-life practice for students. I would recommend this app for school age kids-young adults. You can learn more about this app or download a copy for yourself here in the iTunes store!

**The Virtual Speech Center did provide me with a copy of this app in exchange for a blog review. However, all opinions expressed in this review are my own.**

How I Use Verb Interactive Placemats {Giveaway!}

Thursday, December 17, 2015
Teaching verbs to little ones can be a lot of fun. The best therapy happens when kids can incorporate movement and excitement into an activity. Verbs are perfect for that! What's a better way to teach jumping, running, and throwing than having them actually do the action and then talk about it? I have a student that is working on this goal. We have lots of fun playing Simon Says while she follows directions acting out target verbs. She is also working on using pronouns correctly, so I created these interactive placemats for her to practice using verbs while we also address pronouns!
This activity pack includes 16 pages of verb mats as well as picture cards to use to complete the sentence. I printed and laminated all the pages and then keep them together with binder rings (so it's like a book) There are 2 pages of the small cards included. This is so you can cut one up and attach it with velcro to the second identical page. I take this page out of the "book" for easy access and reference.
 For some students, the whole reference page may be too much, so just take 2-3 pictures off the sheet for them to choose from.
When I am using this, I first have the child choose the small card that matches the picture on the placemat. I ask him/her what the picture is showing then have him/her complete the sentence. For some, I just have them imitate the sentence until they can do this part on their own. 
There is something about velcro that gets kids engaged in an activity! I have also paired this with my Verb Flashcards for extra practice and carryover. Think your kids would enjoy this activity? You can download it in my TpT store here, or enter below for a chance to win a copy!
 a Rafflecopter giveaway


Using the Elf to Promote Speech & Language Skills!

Tuesday, December 15, 2015
In our house, we absolutely love this time of year. One of my favorite holiday traditions is using the Elf on the Shelf with my kids. Before I had kids of my own, I used the elf in my classroom. If you're not familiar with the concept of the Elf on the Shelf,  the elf is supposed to help promote good behavior this time of year. Each night, he or she flies back to the North Pole and reports to Santa. With the overflow of sugar and excitement, there is no doubt that this little elf is helpful. However, I love using the elf for more than just behavior. This little guy is perfect to help promote speech and language skills!
In my book, anything that gets a child talking and using his/her language skills deserves a gold star. There are countless ways that you can use the elf to encourage your child's skills based on their interests, but I thought I would share a few of my favorites. 
Prepositions
Each night the elf moves to a new place in your home or classroom after she returns from her trip to the North Pole. That means, each day is an opportunity to work on a new preposition. Where is the elf today? Well, in our house she is sitting next to the bunch of bananas that look like minions! Yesterday she was inside the stocking and the day before she was on top of the reindeer. This is such a fun way to work on these skills. 

Predicting
Where do you think the elf will be tomorrow? What do you think he will tell Santa tonight? Making predictions is a skill that many kids have trouble with. They have to think abstractly and about the future. After a few days of seeing the elf move to a new place and learning there is a pattern, your child may have an easier time using his/her prediction skills. 

Vocabulary
The elf can give you plenty of opportunities to teach new vocabulary. Where you place your elf and what you place around her gives you the perfect chance to introduce new words. You can use pictures (my favorite is to make it look like the elf is drawing pictures of target words) or put actual items next to her- hey there's another preposition opportunity!  Working in a school? Use your students vocabulary or spelling words for the week.  Working with articulation students? Place some arctic cards next to her. The kids will have no problem telling you what words the elf has set out for them that day.

Expressive Language
I found an elf template on Pinterest a few years ago that I used with my students. They got to color and decorate their own elf. Then they used their creativity and wrote all about their own elf. They named their elf, told me how old the elf was, what he/she loved to eat (most answers were sugar filled!), and what he/she did for fun. I loved hearing their responses and the kids all got so excited about this activity. You can check out my blog post about this activity and find the free download here.

Language comes out when kids are excited. Use the elf collaboratively with things your child loves. For example, if he loves trucks, have your elf drive a big rig! If she loves princesses, set up an elf and princess tea party. In my experience, the sillier the activity, the more language I see.
I hope you have a wonderful, language filled holiday!

Our First Week with the Elf!

Monday, December 7, 2015
Has the famous elf made her or her appearance in your house this year? I have had an elf for 6 years now. She used to visit my students but now that Kenzie is old enough, she visits our home. I have been so excited for Kenzie to be old enough to enjoy the elf, and the year has finally come!
 The day after Thanksgiving, our sweet little elf made her appearance. Of course she didn't come empty handed… Christmas jammies for all! After we read the story, Kenzie decided to name her Belle (which is an improvement from the name she insisted on last year… Pizza!) Belle is here to stay for a while!
 The next day we found her getting to know Kenzie's toy friends and reading them all a story.
 I was super happy to see that Belle was getting into the spirit of Giving Tuesday! She encouraged Kenzie to pack a bag of toys to donate. To my surprise, Kenzie willingly gave 3 big bags of toys away. So proud of my girl!
 Tuesday Belle came in like a wrecking ball!
 Then it was time for a stroll with a reindeer.
 Belle overheard Kenzie asking for fruit snacks for Christmas, so she brought her a little treat.
 I let Kevin be in charge of the elf the other night since he was home (he works nights so it's usually my job to move the elf each night) This is what he came up with. If you can't see, Sheriff Callie is helping Belle get to the Love Troll with her lasso. I love his creativity!

We are having so much with all of these new Christmas traditions! Stay tuned to see what kind of trouble we stir up with Belle this week :)

Edible Christmas Trees (with a free download!)

Wednesday, December 2, 2015
It's beginning to look a lot like Christmas around the Cummings household! I love Christmas decorations and making my house look like a little winter wonderland. I also love Christmas themed activities in and outside of the speech room. Last week during Thanksgiving Break, I had the chance to  do a group therapy session. As much as I love doing one on one therapy, I often miss the group sessions I had in the school system. So last week I got to get back into it and even let Kenzie join in on the fun!
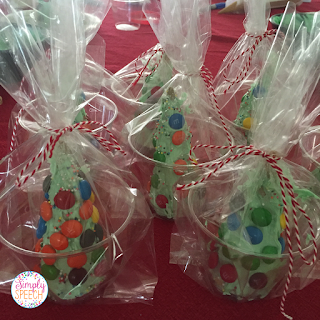
 Since everyone loves a good edible craft, I decided to go with these adorable Christmas trees made out of ice cream cones that I had been eyeing on Pinterest for a while.
To make them, here is what you need:
- Sugar cones
- Vanilla frosting
- Green food coloring
- Candy to decorate with (I used M&M's and sprinkles)
- Plate or cookie sheet to work on
- Knife or spoon to spread the frosting
on the cone
 Here is what you do:
1. Add a 4-5 drops of food coloring to the frosting to make it green. Mix well (I did this part myself since it can get messy)
2. Take a knife or spoon and spread the frosting on the cone. Cover the entire thing.
3. Take some candy and decorate the tree! I used M&M's because I thought they looked like ornaments and sprinkles because they looked like lights :)
Ta-Da! That's it!
Because some students need extra visuals to follow directions, I made visual direction strips using Smarty Symbols. I put them up in my TpT store so anyone making these can have access to them. You can download them (for free) in my store, here!
The kids all had a lot of fun making their own tree. A few made 3 or 4! This activity brought out so much social language, not to mention the intended skills of requesting, following directions, verbs, and descriptive words! 


These little trees make great little gifts, too. I used 9oz clear plastic cups (left over from our Monster Pudding activity!), baggies, and string to gift them up! Even if your students don't want to give them as gifts, this is a great way to send them home without a mess!

Pin of the Week: Holiday Stovetop Potpourri

Saturday, November 21, 2015
What in the world did we do before Pinterest? I don't know how I was able to plan my wedding without it! Have you seen those quizzes out right now that shows your most used words on Facebook? Pinterest was one of mine. I think it's safe to say I have a healthy addiction. So with that being said, let me introduce you to this week's Pin of the Week!
Are you hosting any holiday parties at your house this year? Put away your candles and plug-ins… this recipe for stovetop potpourri will make your whole house smell amazing! You can find dozens of different recipes on Pinterest, but this one is my favorite for the holidays. This specific recipe was found on the I Heart Naptime blog.
Here is what you need:
  • 1/2 cup fresh cranberries
  • 1 orange (sliced)
  • 4 cinnamon sticks (broken in half)
  • 1 TB cloves
  • 1/8 tsp nutmeg
  • 2-3 cups water
Here is what you do:
Combine all of the ingredients in a pot and simmer on low for as long as you have guests over. It is very important to remember to continue to add water to the pot as it gets low. Burnt cranberries and cinnamon sticks just don't smell as good :)

Need a quick holiday gift for a friend, co-worker, or your child's teacher? Bag these ingredients up and gift the holiday smell! I found a ton of cute labels on Pinterest but you can find a few of my favorites here and here. 
I love this so much that I used this pin for my latest segment on Gayle's Guide to Pinterest, check out the video below. 

DIY Turkey Craft!

Wednesday, November 18, 2015
This post contains Amazon Affiliate links for your convenience.
We are just about 1 week away from Thanksgiving! I think I have filled my Pinterest board with more festive pins than I will have time to complete. The other day while I was searching for some fun Thanksgiving crafts, I came across some cute little turkey gifts out of baby food jars! Um, perfect! My kitchen is filled with these since Kameron just started out on solid foods. I have been saving the jars because I want to make my own baby food and will use them to store the food in. My husband keeps wanting me to throw them out but boy let me tell you, one person's trash is an SLP's treasure!
I always love pairing crafts with a story. This week we have been reading 

I have a cute freebie in my TpT store that goes with this book. You can snag it here!
If you need a list of Thanksgiving books to use, check out this blog post!
These turkeys are so cute and very easy to make.
Here is what you need:
- empty baby food jars (one for each turkey)
- construction paper
- scissors
- pen/pencil to trace with
- goggly eyes
- something to put in the jars. I used M&M's but any little treat will do. I have also seen these jars painted instead of filled. Whatever floats your boat!
 Here's what you do:
1. If you're going to fill the jars, it makes life easier if you do this step first.
2. Trace your student/child's hand on construction paper- 3 hands were plenty for the jars we used.
3. Cut the hands out.
4. Glue the hands to the back of the jar so they look like turkey feathers.
5. Add a beak out of orange construction paper and goggly eyes!
Ta Da!

These turkeys are perfect for little gifts or even table decorations at the kids table on Thanksgiving! Your students can practice lots of language and fine motor skills as they create their own little craft. Happy crafting!

Object Function Interactive Placemats!

Wednesday, November 11, 2015
Labeling and identifying objects is something we teach constantly. 
"What is this called?" "Where's the cup?" 
It's second nature to some people to just ask these questions to our little ones about common objects. But how many of your kids know what each object is used for? Object function and use is just as important as knowing what the item is called. 
I created these Object Function Interactive Placemats for one of my students, but I also use it with my daughter. This packet contains 16 object placemats with matching function cards. To use this, print out all of the object placemats and 2 pages of function cards. I like to cut out the individual cards on one of the pages, then velcro them to the second matching page to keep it organized. These can be presented one at a time, or put together like a book with binder rings (as shown in my photos)
 Present the object placemats one at a time. Have your child search the function card page for the correct card to complete the sentence. For some kids, the entire page may be overwhelming. You can present a 2-3 cards at a time if that better suits your child. After they found the correct function, have them read or imitate the sentence.
"I write with a pencil."
This is a fun, hands on way to teach object function! You can download a copy in my Teacher Pay Teachers store, here.

Moowi Puppet! A Product Review

Tuesday, November 10, 2015
Another Tuesday is here! What's on your lesson plans for the week? Are you diving into Thanksgiving stories yet? I love when I am able to add hands on visuals with stories that I read with my students. Print outs are fun, but puppets are even better! I was very excited when the  people from Moowi contacted me about reviewing one of their puppets. According to their website, the Moowi Puppets are speech and language therapy tools to help make articulation exercises fun! They each have a large mouth with teeth and tongues that can be used to demonstrate speech sounds and oral placement. Plus, so many kids love puppets that it will help keep active and easily distracted kids engaged in therapy. 
There are so many ways that puppets can be incorporated into therapy sessions. Here are a few ideas I came up with while playing with our own Molly the Dinosaur (yes, we named her!)
- Articulation drill (imitate what the puppet said)
- Teaching how speech sounds are made and about the articulators. 
- Following directions (I can speak from experience saying that kids follow directions better when they come from a puppet!)
- Story characters for books read during therapy.
- Have your students practice social skills and holding a conversation with the puppet. (Puppets are often less intimidating!)
- Asking and answering questions with and about the puppet.
- Making inferences about the puppet.
- Have your students make up a story with the puppet as the main character.
These puppets are made with durable, yet very soft material. Kenzie and I had a great time using the puppet with our little Kameron and making him laugh! My husband's hand was a very tight fit, but the puppet was a great size for myself and my daughter to use. If you visit the Moowi website and look under materials, you can view all of the puppets they offer. There are dogs, cats, bears, and dinosaurs... just to name a few. They just recently added a giraffe, too! These puppets can be a great addition to your therapy bag of tricks. This dinosaur puppet is now permanently added to my early intervention bag! You can learn more about the puppets and purchase your own by visiting the website, here. Moowi is based out of Poland and the prices are in Euros, however, they do have a currency exchange feature that will allow you to see how much the puppet or puppet bundle will cost you. 
Moowi did provide me with a puppet in exchange for a blog review, however, all opinions expressed in this review are my own.
Powered by Blogger.