Simply Speech: Pinterest

Showing posts with label Pinterest. Show all posts

Edible Christmas Trees (with a free download!)

Wednesday, December 2, 2015
It's beginning to look a lot like Christmas around the Cummings household! I love Christmas decorations and making my house look like a little winter wonderland. I also love Christmas themed activities in and outside of the speech room. Last week during Thanksgiving Break, I had the chance to  do a group therapy session. As much as I love doing one on one therapy, I often miss the group sessions I had in the school system. So last week I got to get back into it and even let Kenzie join in on the fun!
 Since everyone loves a good edible craft, I decided to go with these adorable Christmas trees made out of ice cream cones that I had been eyeing on Pinterest for a while.
To make them, here is what you need:
- Sugar cones
- Vanilla frosting
- Green food coloring
- Candy to decorate with (I used M&M's and sprinkles)
- Plate or cookie sheet to work on
- Knife or spoon to spread the frosting
on the cone
 Here is what you do:
1. Add a 4-5 drops of food coloring to the frosting to make it green. Mix well (I did this part myself since it can get messy)
2. Take a knife or spoon and spread the frosting on the cone. Cover the entire thing.
3. Take some candy and decorate the tree! I used M&M's because I thought they looked like ornaments and sprinkles because they looked like lights :)
Ta-Da! That's it!
Because some students need extra visuals to follow directions, I made visual direction strips using Smarty Symbols. I put them up in my TpT store so anyone making these can have access to them. You can download them (for free) in my store, here!
The kids all had a lot of fun making their own tree. A few made 3 or 4! This activity brought out so much social language, not to mention the intended skills of requesting, following directions, verbs, and descriptive words! 


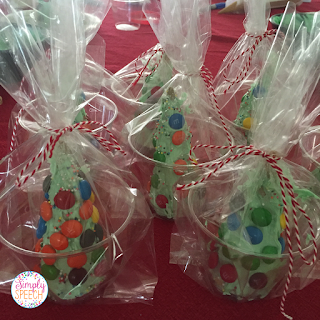
These little trees make great little gifts, too. I used 9oz clear plastic cups (left over from our Monster Pudding activity!), baggies, and string to gift them up! Even if your students don't want to give them as gifts, this is a great way to send them home without a mess!

Pin of the Week: Holiday Stovetop Potpourri

Saturday, November 21, 2015
What in the world did we do before Pinterest? I don't know how I was able to plan my wedding without it! Have you seen those quizzes out right now that shows your most used words on Facebook? Pinterest was one of mine. I think it's safe to say I have a healthy addiction. So with that being said, let me introduce you to this week's Pin of the Week!
Are you hosting any holiday parties at your house this year? Put away your candles and plug-ins… this recipe for stovetop potpourri will make your whole house smell amazing! You can find dozens of different recipes on Pinterest, but this one is my favorite for the holidays. This specific recipe was found on the I Heart Naptime blog.
Here is what you need:
  • 1/2 cup fresh cranberries
  • 1 orange (sliced)
  • 4 cinnamon sticks (broken in half)
  • 1 TB cloves
  • 1/8 tsp nutmeg
  • 2-3 cups water
Here is what you do:
Combine all of the ingredients in a pot and simmer on low for as long as you have guests over. It is very important to remember to continue to add water to the pot as it gets low. Burnt cranberries and cinnamon sticks just don't smell as good :)

Need a quick holiday gift for a friend, co-worker, or your child's teacher? Bag these ingredients up and gift the holiday smell! I found a ton of cute labels on Pinterest but you can find a few of my favorites here and here. 
I love this so much that I used this pin for my latest segment on Gayle's Guide to Pinterest, check out the video below. 

Pin of the Week: No Mess Monster Finger Painting!

Wednesday, October 28, 2015
The countdown to Halloween is on! I am trying to jam pack as many spooky therapy activities and craftivities into my therapy sessions as possible. The other day when I was perusing Pinterest, I came across this Mess Free Monster Painting activity by Toddler Approved. We have been on a monster kick at home lately so when I saw this I immediately pinned it with K in mind. But let's be honest, the real winner was where I saw "mess free" painting. Since it's mess free, it's a fun activity to do at home or at school.
Here's what you need:
-Large zip lock baggies (1 for each kid. I used gallon size)
-Card stock (I was out of card stock so I cut up some file folders)
-Paint
-Googly eyes
-Glue
-Painters tape if you want to be extra careful that the pain doesn't come out of the bag. Mine stayed in with the zip lock, but you can never be too careful!

Here's what you do:
1. Draw an outline of a monster onto the card stock. If you are not confident in your monster drawing abilities, there is a template you can download here.
2. Cut out your drawing then put the monster outline inside the baggie. 
3. Squeeze some paint into the baggie. Be pretty generous with the paint, I ended up having to re-open the bag and add more half way through to make sure we could cover the whole monster.
4. Seal the baggie up (this is where the tape comes in if you are nervous with just the baggie)
5. Let your little one finger paint the monster!
One he/she is done creating their "monster-piece" carefully take the monster out of the bag and let it dry.
Once the monster is dry, add some googly eyes (you really can't have too many!) and that's a wrap. This is a lot of fun and really is mess free! I like pairing this activity with a Halloween story but you really could do this activity any time of the year!
If you missed my post on Monster Pudding Cups, you can check it out here. Who wouldn't love some pudding after crafting?!

Pin of the Week: Monster Pudding!

Friday, October 23, 2015
This post contains Amazon Affiliate links for your convenience. 
Happy Friday! It's that time of year when pumpkins, ghosts, and goblins are invading your speech sessions! If you have been following my blog for a while, you know I just love a good thematic activity. One of my favorite books to read during the weeks leading up to Halloween is, Go Away, Big Green Monster by Ed Emberley.
This book is perfect if you are in a school that doesn't allow Halloween themed activities. It's a cute monster book that has lots of descriptive words. I actually plan on reading this book and making some monsters with Kenzie this weekend, so I will post some pictures after we do. 
After you read the story, how about you make some monster pudding?! This is a very simple but fun activity that will help your students work on their sequencing and following direction skills… plus it's yummy! 
Here is what you need…
1 package of vanilla Jello pudding 
2 cups of milk
green food coloring
chocolate sprinkles
9oz clear plastic cups
goggly eyes
black sharpie
large mixing bowl
wisk

Here's what you do…
1. Make the pudding according to the directions on the box (pour contents of box into a bowl, add 2 cups of milk, and stir)
2. Add 3-4 drops of green food coloring
3. Add goggly eyes and draw a face on the clear plastic cups.
4. Add the green pudding to the plastic cups.
5. Add sprinkles on top for hair!
6. Eat!
These pudding cups are so fun to make… and even more fun to eat! Kenzie and I had so much fun making them, talking about what ingredients we needed, and what steps come next. This activity was featured on this weeks' segment of Gayle's Guide to Pinterest. You can check out the video on my Facebook page. Have a great weekend!

Pin of the Week: DIY Dry Erase Boards

Friday, October 9, 2015
Ahhh, happy Friday! Life is crazy these days. Weeks fly by and I feel like I can barely keep up with what day it is. I love to be organized but sometimes it's hard. Real hard. Lately, the best way for me to stay organized and not forget things, is to keep lists. Between to-do lists, grocery lists, and reminders, I have pieces of paper all over my house. I needed a better way. So of course, I turned to Pinterest for some inspiration. I found these super simple and very cute "do it yourself" dry erase boards!
 Here is what you need:
- A picture frame Any size will work… pick one that will fit your needs the best.
- Scrapbook paper You can find some pretty colors or patterns that will match your decor! I found some cute paper that looked like handwriting paper from school that I thought would be perfect for to-do lists!
- Dry erase markers
- Magnets These are optional but work really well on the back of the frame if you want to stick it to your fridge. Just make sure you buy strong, large magnets if you do this.
Here is what you do:
1. Take the back off the frame.
2. Remove the paper/sample photos from the inside of the frame.
3. Insert your scrapbook paper. You may have to trim it down depending on the size of the frame.
4. Put the back of the frame back on and BOOM you have a dry erase board!

Told you it was simple. If you look on Pinterest, there are so many different ideas and options for creating a unique board. Some other ideas I liked was using burlap instead of scrapbook paper or even paint chips for a very colorful effect.
The two pictured above are the ones I use at home. The black frame I keep by my desk. It's usually filled with to-do's and reminders. The smaller white frame I keep in the kitchen for meal planning. I found the Menu template here.  I loved this idea so much that I used it for my 3rd segment on Gayle's Guide to Pinterest! You can view the segment below :) Have a great weekend!

Pin of the Week: Crockpot Cheeseburgers!

Friday, October 2, 2015
Who is a fan of quick and easy dinners? When I am cruising Pinterest for a new dinner idea, I usually put the word "easy" into the search box. Of course it goes without saying that it has to be yummy, too! A few months ago I can across this pin for Crockpot Cheeseburgers. The first time I made them was for one of our weekly Sunday-Funday Family dinners. We were hosting that week and I had just come across the pin a few days before, so I thought I would use my family as Guinea pigs. They were super easy, amazingly delicious, and had everyone asking me for the recipe before they left. 
According to the original recipe by Mostly Homemade Mom, here's what you need:
  • 2 lbs ground beef
  • 1 medium onion
  • 3 cloves garlic, minced
  • 2 tablespoons yellow mustard
  • 6-8 Vlasic Farmer's Garden Zesty Garlic Chips, chopped
  • 8 oz Velveeta cheese
  •  rolls and burger toppings

Here's what you do:
1. Brown the ground beef and drain it.
2. Transfer the ground beef to the crockpot. (The first thing I always do when using the crockpot is put in a crockpot liner. You can buy them at the grocery store and it seriously saves you major scrubbing time later!)
3. Add the onion, garlic, mustard and pickles. I personally don't add the pickles to the crockpot, I just put them out as a topping for the burgers once they are ready to be served. 
4. Cook on low for 2 hours! It comes out like a melty, cheesy sloppy joe!
These are so good! I promise you, you will be glad you tried these. We don't have a grill at our  house yet so this is my solution to still having a burger every once in a while. I loved this recipe so much that I chose to feature it on my second segment of Gayle's Guide to Pinterest! You can check out the video below!
Happy Pinning!


Hanging out with the News Crew!

Sunday, August 30, 2015


If you follow me on Instagram (@simply_speech) you probably have seen several pictures of me getting crafty with some friends at my favorite place, Aerie Lane. Last week, I headed over to Aerie Lane to help film a segment called, Gayle's Guide to Pinterest. Gayle Guyardo is a local news broadcaster here in Florida. For a few months now she has been featuring fun Pinterest crafts, recipes, and ideas once a week. I was more than excited to participate in this feature and make a burlap wreath for one of her segments. While there, I was asked if I wanted to film a few segments myself. Well, sure I would! I love Pinterest!! Actually my nerves were freaking out, but I agreed anyway. So on Tuesday, she came over and we filmed 2 segments. One of them was on DIY Baby Wipes and aired on Wednesday and the second was on Crock Pot Cheeseburgers and will air in 2 weeks. 
If you have a little one, you have probably heard about the concern a lot of parents have right now with Huggies wipes. Some parents have found what they think is fiberglass in their wipes. Huggies insists that it is not fiberglass but the way their fibers form when making the wipes. Either way, sharp particles in a wipe is not ok. When I had Kenzie a few years ago, I came across a pin for DIY baby wipes. When I checked it out, I realized I had all of the ingredients in my house already, so I gave it a try!

To make the wipes, here is what you need:

  • 1 roll of paper towels (use the good ones, the cheap wipes will disintegrate)
  • 1 cup of water
  • 1 tablespoon baby wash
  • 1/2 tablespoon baby oil
  • knife (big one, like scary big!)
  • container
  • measuring cup
  • cutting board
Making your own wipes will save you a ton of money and give you the peace of mind knowing exactly what is in the wipes you use on your little one. Plus, they smell amazing.
You can check out the Channel 8 News Segment below!
Powered by Blogger.